Well, hello again!
It has been just over an year since the last post.
I have a few articles in the cauldron, hopefully they will get out soon.
Especially, I had some time experimenting and fixing some stuff I wanted to get working for quite some time.
If all goes well, you will get:
The journey of upgrading a Vue SPA from Vue CLI to Vite
How I repacked the OBS Browser plugin in order to be built on Linux without requiring building the full OBS
How to actually Secure Boot on ArchLinux with Grub (if I get it working with shim… PreLoader is old but works)
It has been, oh boy, more than 6 years since my last article here.
Well, the main reason of my silence is that my view for this blog faded away
slowly.
While initially I was planning to use this to share cool tech tutorials with my
friends, I quickly lost patience doing so.
Additionally, all the life events that happened, which include a change of
country and starting a family, took my attention away from any news writing.
However, I always had an itch for this website to come back, somehow.
And I do believe I have an idea of how to.
Meanwhile, enjoy the code updates in the repository. Bests!
As written in title, this post will be about setting up a working USB connection
for ArchLinuxARM (a port of the magnificent
ArchLinux for the ARM architecture).
This is made for this kind of setup:
a shared DHCP connection through NetworkManager (can be adapted to everything else though)
a BeagleBoneBlack connected by mini-USB to the computer.
With this tutorial you will have a working shared network between the BeagleBoneBlack
and your computer,
with included dynamic IP resolution (no more ssh IP_HERE).
Some thoughts:
I’ll say when commands have to be done on the host (see: your computer/laptop),
else they have to be done on the client (the BeagleBoneBlack).
In a theoric way, this tutorial should be fine for any ArchLinuxARM device;
just pay a bit more of attention.
I assume that the users reading this tutorial are a bit experienced (else GTFO);
also, the commands with before a $
will be commands that can be given as users, the ones with ! should be given
by the user root.
Let’s do this
So, these are the steps:
Install ArchLinuxARM (from now on ALARM) on your BeagleBoneBlack;
for this, I just suggest the
official tutorial.
For the following part of this tutorial, I assume you’ve installed your ALARM
(on MicroSD or on eMMC is the same).
From your host, share connection to your BeagleBoneBoard;
I did this by connecting the device using an Ethernet cable plus an USB for power.
Also, I allowed sharing connection through Ethernet with NetworkManager
install dnsmasq, as it will allow shared networking through NetworkManager
open nm-connection-editor
Suggested: create a specific connection for the BeagleBoneBlack with nm-connection-editor
under IPv4 settings set “Shared”
I had then to use nmap on the host to find out the IP
go on NetworkManager
find out the IP of the shared Ethernet network (e.g. 10.42.0.1)
find the actual IP of the BeagleBoardBlack by inspecting the network, doing something like:
$ nmap 10.42.0.1/24
# Here comes the output
Starting Nmap 6.47 ( http://nmap.org ) at 2015-07-24 17:21 CEST
Nmap scan report for 10.42.0.1
Host is up (0.00064s latency).
Not shown: 999 closed ports
PORT   STATE SERVICE
53/tcp open  domain
# Here it is!
Nmap scan report for 10.42.0.143
Host is up (0.00056s latency).
Not shown: 999 closed ports
PORT   STATE SERVICE
22/tcp open  ssh # See, SSH port is open
Nmap done: 256 IP addresses (2 hosts up) scanned in 2.56 seconds
Actually, connect from the host to your device with SSH
$ ssh root@10.42.0.143 # Use the IP found in the step before, user 'root' password 'root'
In order to work with just the USB cable, you need to download the gadget-deadbeef-dhcp package;
the package was meant to enable connections through USB, I made the -dhcp version to have dynamic IP
(we won’t have problem with it later). You can get it with a:
$ yaourt -S gadget-deadbeef-dhcp
Else, you will have to build it:
! pacman -S base base-devel wget # Let's have all installed$ wget https://aur4.archlinux.org/cgit/aur.git/snapshot/gadget-deadbeef-dhcp.tar.gz
$ tar xf gadget-deadbeef-dhcp.tar.gz
$ cd gadget-deadbeef-dhcp
$ makepkg -srci# Builds without dependencies problems, clean up the temporary files and install# If you've problems, use 'pacman -U' as root
Notice: people that want it to work even with Windows have to install
the gadget-deadbeef-legacy-dhcp package, as the one above uses a driver which
is not (still) supported from BeagleBoard official Windows drivers; so,
just follow the steps above, replacing gadget-deadbeef-dhcp with gadget-deadbeef-legacy-dhcp.
PRO TIP: I had to reinstall the official BeagleBoard drivers, which can
be found here. I had problems as
Windows 8.1 didn’t allow me to install unsigned drivers; so, if you get to
the last step of drivers installation and you get red crosses (error in installation)
and you don’t know why, try reinstalling after doing
this.
Now we have to set up things for hostname resolution. Well’use Samba for this.
It can be used for many more things, but in this case we’ll use just its NetBIOS ability.
So, get Samba and enable the NetBIOS daemon:
I’m really having an hard time in this period (exams, duh) but considering
the fact I’m having more views that I ever expected,
I’m gonna drop something useful here.
Don’t worry, long posts with many informatics technical stuff are
already in background.
I’m thinking about a server-related tutorial series, I suppose people will
enjoy.
Anyways, back to the topic.
What do you mean in the title?
Let’s be honest, Android OS can’t be perfect. We already know this.
But there’s lot of customization avaible, which makes it my favourite mobile OS
(for now… But I think/hope this won’t change).
Anyways, I can detect with SD Maid
about 1.8 GB of Stock Gallery thumbnails. And that’s a big bunch of crap.
(PRO TIP: visit darken’s website or take a look to his
G+)
Why this happens?
Actually, Android just tries to speed-up the Gallery (in my case, Google+ Photos
app) by creating a local preview that can be loaded really fast by gallery apps…
However, this creates the junk I told before.
Any fixes?
Yeah, the title would be different if it wasn’t like this.
However, this requires a mobile with a custom recovery
(like ClockWorkMod or TWRP)
and some Android/Linux OS knowledge.
(At least, try to understand what follows next.)
Let’s go!
The idea is to make impossible to create new thumbnails; so, why not deleting the
thumbnails and make the folder to be impossible to access?
Exactly, this will make the trick.
Now, reboot your phone in recovery mode and open your shell (in TWRP there’s
one that can be runned in recovery, else connect your phone to your PC and use
an adb shell… check that you’re using root with whoami)
cd /sdcard # Should exist as fallback... anyways, getting in your main memory foldercd DCIM # Entering photos folder, where thumbnails arerm-f .thumbnails/*# Removing all thumbnailschmod 000 .thumbnails # Making the thumbnail folder not accessible anymore
Done! Now the thumbnails in the Gallery app will be generated on the fly… and you will have some free memory now.
That’s all for now, folks!
Wait for the tutorial series.
Everybody loves YouTube, doesn’t it? I love this service too.
I see lots of videos from it and I’m really satisfied with this service.
So, free candies and hugs for everybody, yuppie…
(Notice: you can skip to the TL;DR part at the end of the page.
PRO TIP: you can search for it in your browser.)
But…
Yeah, bad news here. It uses Adobe’sFlash Player.
The plugin that has just been used for flash games and Youtube.
Actually, as you should know, Linux has outdated Flash plugin
(11.2, when the upstream one is 11.7) that is stable but… well,
it’s not updated, fine?
Apart from this, on my main OS (Antergos, an
ArchLinux with lots of goodies in it and a fully working
desktop manager) I’ve no video thumbnail when shifting the player cursor. And no
default hardware accelleration. Yup. (But read below for some juice.)
Also, even on Windows I’ve some problems with hardware accelleration (With my
Intel Graphics, I’ve some hardware decoding issues on some formats, as 480p).
SPOILER: Nerd stuff ahead… more then usual, yes. If you’re not interested, skip to next paragraph.
Thanks to Rinat Ibragimov, it’s possible to use
an updated version of Flash even on Linux; thanks to his hard work, now we have
avaible a PPAPI-to-NPAPI conversion plugin that allows to use the
PPAPI Chrome plugin on Firefox.
If you’re interested, take a look here,
while you can track hardware decoding specific stuff and progress
here.
This awesome developer also developed the awesome
libvdpau-va-gl, that allows to use
VA-API as a VDPAU backend for hardware accelleration.
(As Flash just supports VDPAU for hardware accelleration… So many
facepalms for me.).
Translation for human mortals:
you use VA-API for VDPAU accelleration = hardware accelleration for Flash on Intel graphics.
Here you’ve
installation tutorial for Ubuntu.
Instead, for installing libvdpau-va-gl on ArchLinux you could do something
in a shell like this:
# Installing required packagessudo pacman -S libvdpau-va-gl libva-intel-driver flashplugin
# Enabling HardWare Accelleration for Flash pluginsudo sed-i's/#Enable/Enable/' /etc/adobe/mms.cfg
# Making avaible the driver through environment variablesecho"export VDPAU_DRIVER=va_gl">> .bashrc
# Activate it for the actual sessionexport VDPAU_DRIVER=va_gl
Notice: in this way it’ll work just for the user which exports the variable;
to make it default for the whole system, you should create a
/etc/profile.d/vdpau_vaapi.sh
script with this commands:
#!/bin/shexport VDPAU_DRIVER=va_gl
This will do the trick.
The solution is… HTML5!
As you should know, YouTube has made avaible an HTML5 player avaible
here.
This make the YouTube experience free from the problems given by Flash Player.
Also, it has no problem in playing all the videos avaible with Flash, it has
60 FPS videos support (and Flash does not) and uses
hardware accelleration (it should… I can’t be sure about it, as no
related source code is avaible, but it should use hardware accelleratedHTML5 canvas).
But… #2
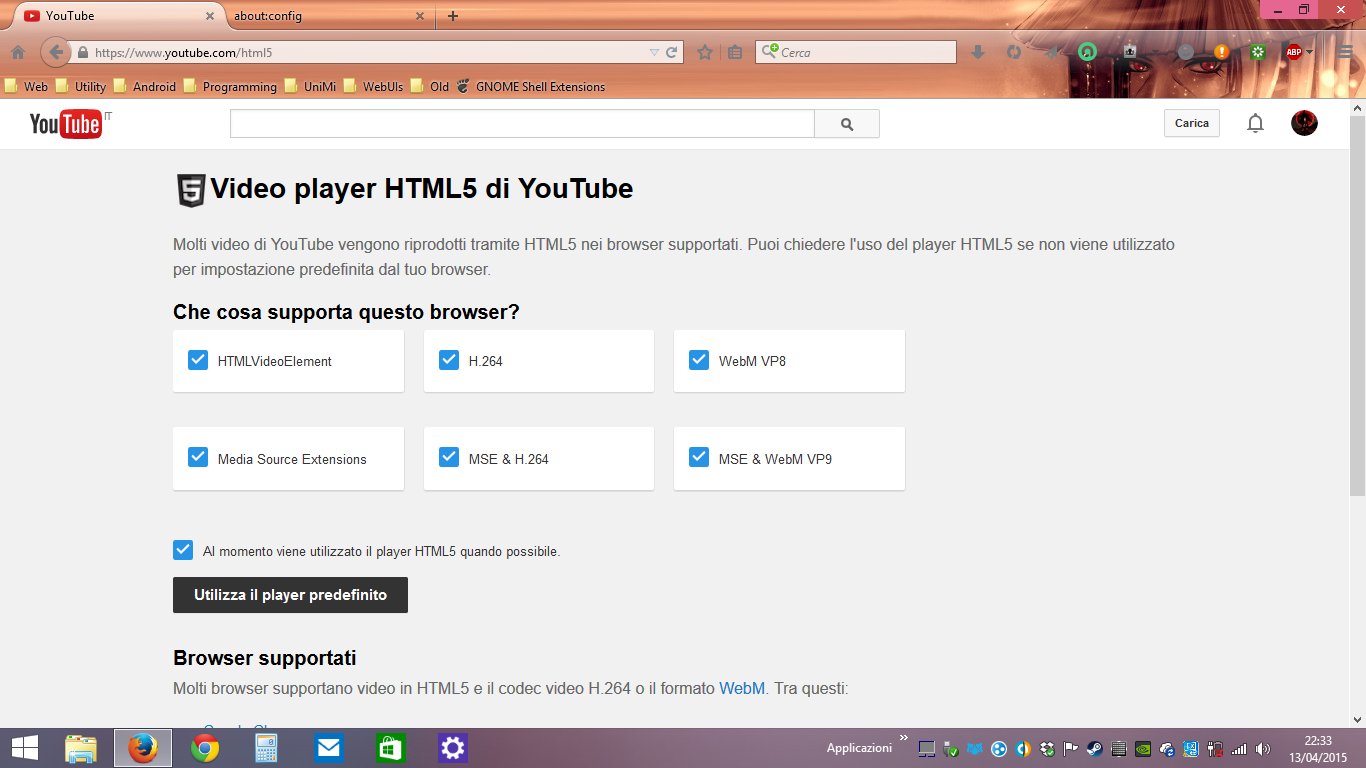
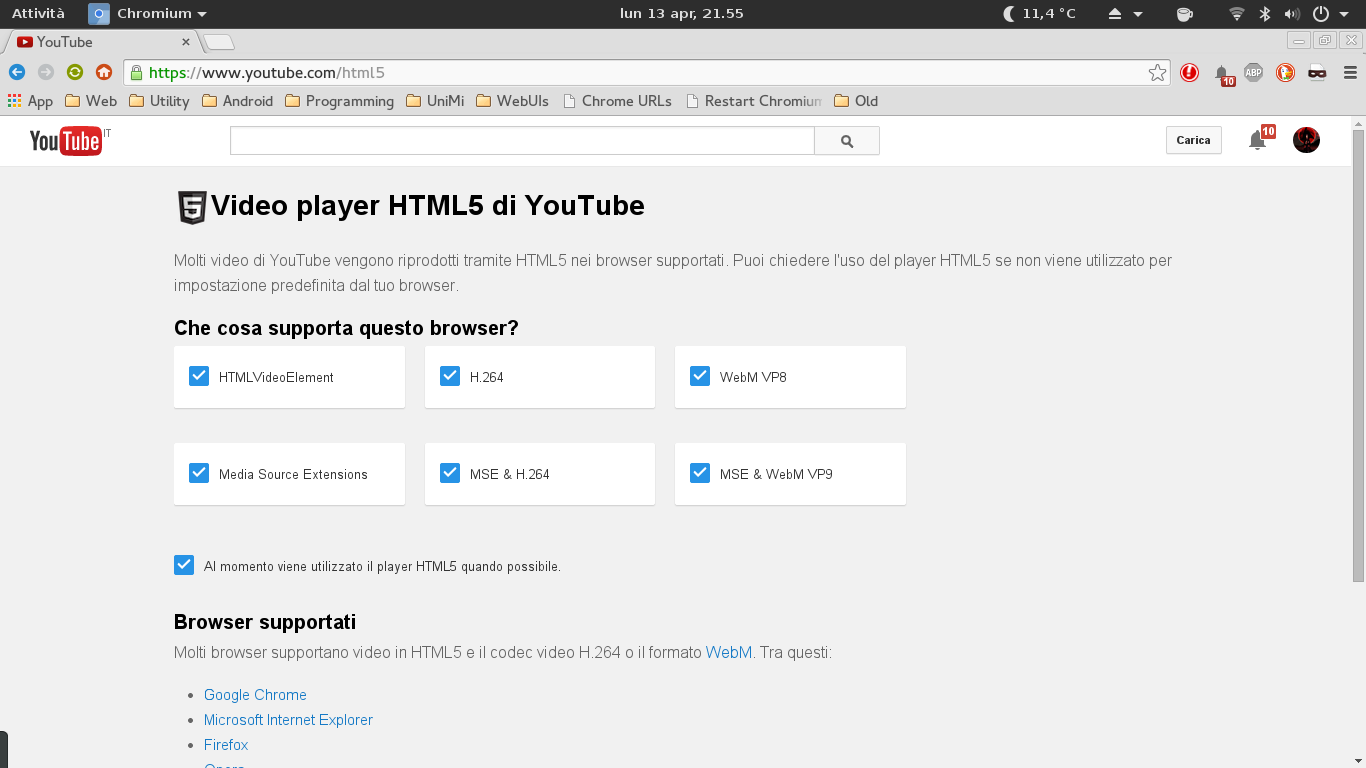
Actually, it fully works just on Chromium/Google Chrome…
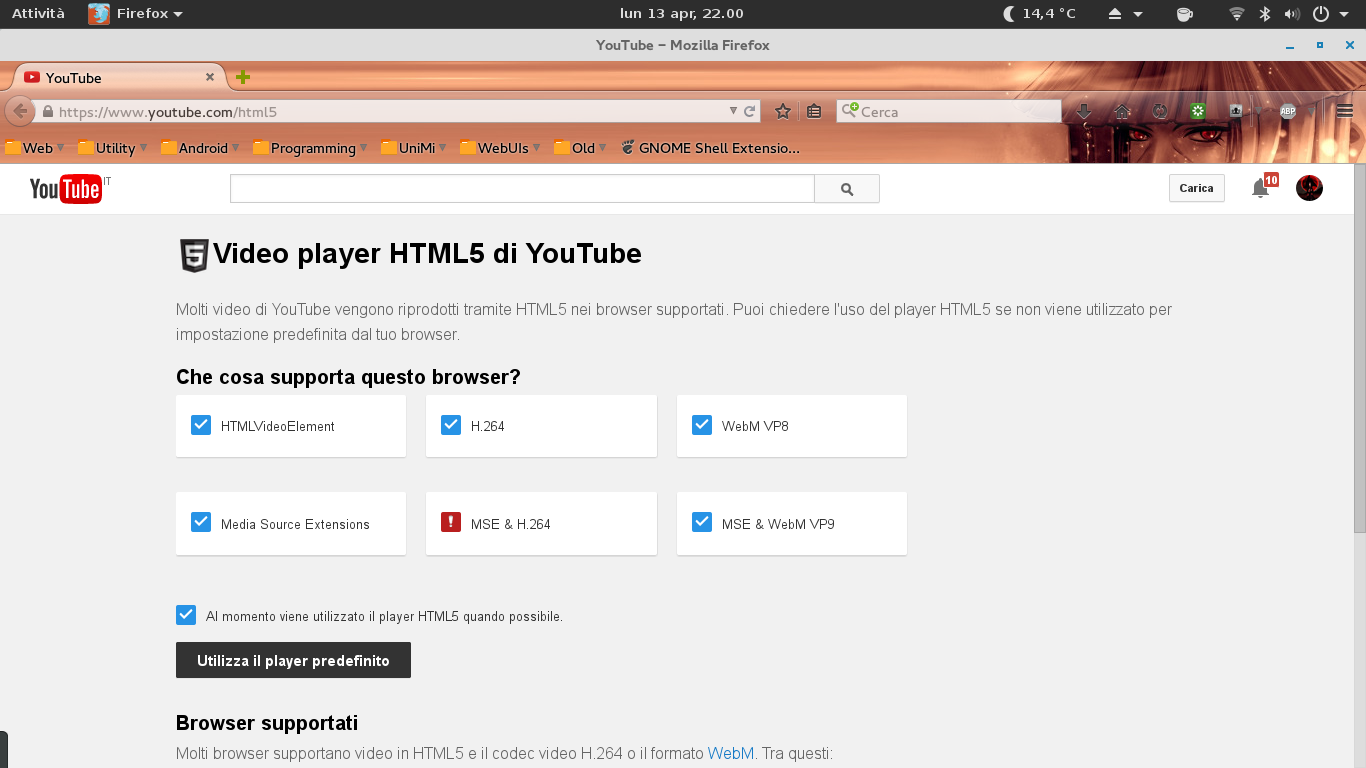
While on Firefox…
And on Windows Firefox
The final solution (TL;DR)
In order to have a fully working HTML5 YouTube player in Firefox, you just
have to open the internal configuration
here (Remember, just for Firefox), press the big “Yeah, I’ll be
a fine boy” button (can’t remember the proper English text, sorry) set the
flags shown below as suggested (PRO TIP: you can use the built-in search bar):
And finally…
Firefox on ArchLinux
And on Firefox on Windows.
The end
Well, that’s all folks for now.
If it’s interesting, show some love and press the share button I’ve put below
and thank you for reading up to this point.
See you guys!
 While on Firefox…
 And on Windows Firefox

 And on Firefox on Windows.